The Wayfinder
Navigate Travel Like an Expert
For four days and three nights, I hauled a 30-pound backpack around the Andes Mountains on my way to Machu Picchu. I slept on the hard ground in a tent and woke each morning before the sun rose. I didn’t shower. I went to the bathroom in stalls that were more disgusting than the porta potties at the Indy 500. My knees ached from the constant pounding on stone steps, and I had to endure rain more than once. But ...
It was one of the greatest experiences of my life.
I got to spend four days surrounded by endless mountain peaks and deep valleys. I climbed to an almost 14,000-foot summit in a country nearly 4,000 miles from home. I stood in places where the Incas worshipped and cooked and played with their children on a daily basis. I laughed over popcorn and cacao tea with people from all over the globe who had the same desire to conquer this trail as I did.
Mainly, I felt in awe of this world around me — the mountains, the people, the history. And I want to help you do the same.
Hiking the Inca Trail is no easy feat. Let me tell you, there were moments when I was cursing everything in sight. But with a little planning, you can make it the trip of a lifetime. Below is everything you need to know to book, train, and travel the trail.
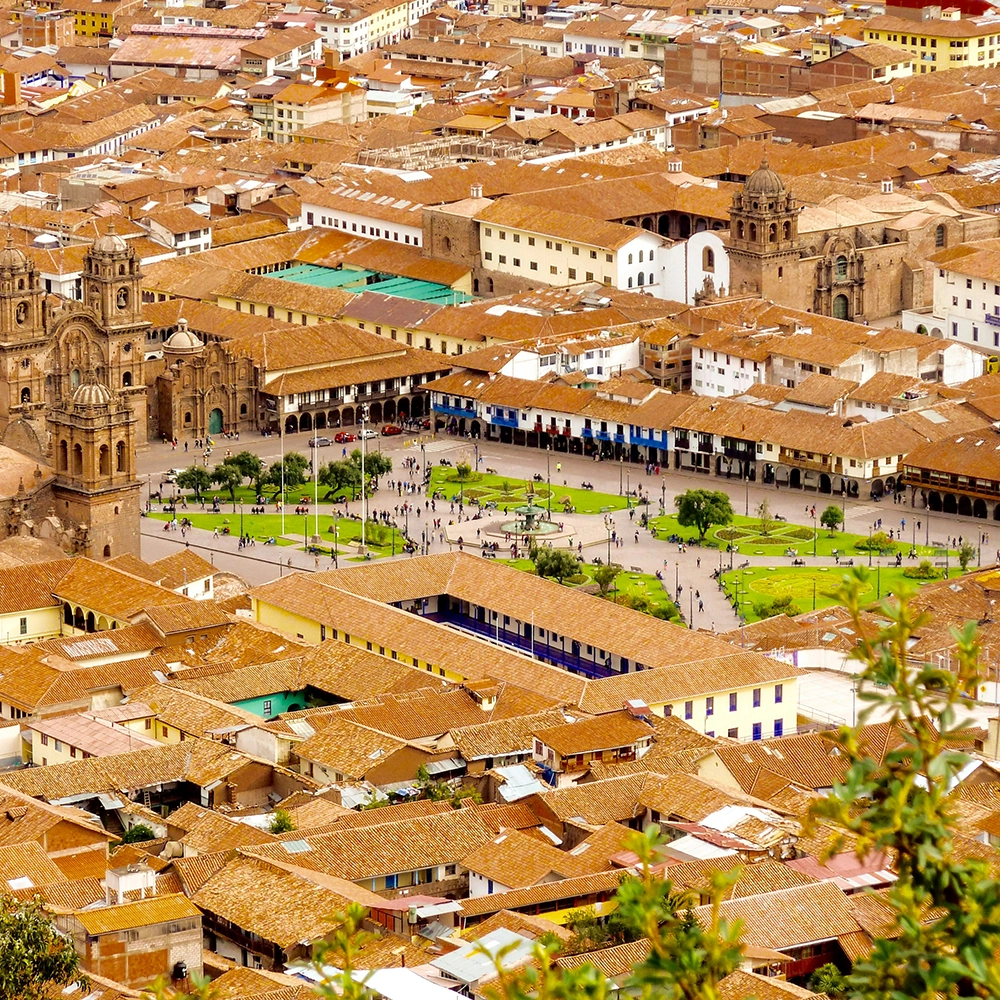
Unless you already live at high elevation, you will want to fly into Cusco at least two days before you leave on your hike. Cusco is the base town for the Inca Trail treks and where everyone gets acclimated to the elevation, letting their body adjust so they can hopefully avoid altitude sickness.
If you are used to elevation, you could probably fly in the day before your hike, although again, two days prior is best.
I used CheapOair to find and book my flight into Cusco, but definitely start your search months prior to leaving to find the best deal. I ended up booking my flight about six months out because the fares were so low.
One thing to note: the cheaper the flight, the worse the layovers. My friend and I found a great deal, but this meant that we had to sleep on the cold linoleum floor of the Lima airport on our way to Cusco. This wasn’t enjoyable. It did save us a few hundred dollars, but you have to know what you are willing to trade off.
Because most (if not all) tour groups leave from Cusco and drop you off there at the end of your trip, you will want to book lodging there both before and after your hike. Luckily, it is a mecca of hostels, so if you’re trying to save money, this is where you will do that.
I found my lodging through Airbnb, and for three nights (two before and one after), it cost me a total of $36. I told you, it’s cheap.
It wasn’t the Ritz by any means, but there was a bed, and breakfast was included in the morning. And that was all I needed.
Here are two suggestions before you book. First, try to stay within comfortable walking distance of Plaza de Armas. This is the city center, but being near it to take advantage of the city during your days prior to the hike isn’t the only upside. Many tour groups also meet there before leaving for the trail. You won’t want to drag your stuff across an entire city at 5 a.m.
Second, verify with either your hotel/hostel or your tour group that there will be someplace to store your extra luggage. You won’t take everything with you on the trail, so you need somewhere secure to leave it. Our tour group provided this service for free, which is common but still worth confirming before it’s too late.
The Peruvian government limits the number of people who can travel on the trail each day to roughly 500, and about 60% of these are for the porters who carry supplies for the tourists.
This means that only 200 permits are available each day for travelers and most, if not all, are allocated to tour groups or private guides. If you’re hoping to travel the trail solo, it’s going to be much more difficult to get a permit.
Because the Inca Trail is such an iconic trip, spots on tours tend to fill up fast. And I mean, FAST. We were six months out from when we wanted to go, and our first choice of dates was already taken by the time we were ready to book.
I’ll be honest. Seeing as I’ve only done this once with one tour group, I can’t vouch for one tour group being better than the other; however, we used SAS Travel and had an amazing experience.
Treks booked through these types of groups will cost anywhere from $600 to $2,000 (plus any credit card/PayPal processing fees, which usually run from 3-5%) and will normally include all your meals, tent, transportation to and from the trail, and entrance fee to Machu Picchu.
Other items, like sleeping bags and walking poles, usually can be rented through the tour company, but they do cost extra.
The best time to hike the Inca Trail is May through August, when the weather is clear and downpours are less likely. Rainy season for the Inca Trail is from October through mid-April, which means you probably want to avoid it altogether during those months.
July and August are the busiest months, so try to book your trek in May or June. We went in mid-May, and the weather was almost perfect throughout the entire trip.
Don’t expect, however, to not get rained on at all during the dry season. You are in the mountains where weather is a little unpredictable, so be prepared for everything.
Yes, you have to get some immunizations for Peru. Don’t wait until a month before your trip like I did. Depending on the required shots, you may have multiple rounds or need at least six weeks before your trip to let immunity kick in. Try not to procrastinate.
The only immunizations I needed were for typhoid and Hepatitis A. However, consult your doctor and ask about altitude sickness medication as well. I had never had an altitude issue before, but I also didn’t want to risk it. Who wants to be sick while in the mountains?
If you really want to enjoy this trip, you’re going to have to train for it. That means your butt needs to be in the gym and on the trails.
Technically, you don’t have to go to a gym, but you do need to be getting some serious workouts in. Not only are you hiking six to eight hours per day, but you’ll be doing it at a high elevation while carrying an extra 10 to 30 pounds. That takes strength and endurance.
My normal gym routine includes one leg day per week, but prior to the trip, I upped it to two since my body was already accustomed to lifting. So what does leg day entail? Just think squats, lunges, calf raises, more squats, more lunges … you get the picture.
You want to build up those legs as much as you can because you will have to push yourself up A LOT of stairs along the trek. Weak legs won’t do you much good.
If you need some help creating a workout, ask a personal trainer or join a group fitness class at your gym. There are also loads of resources online, but make sure you’re taking advice from trained, reputable professionals.
You’ll also want to mix in two to three days of cardio to get those lungs ready for the reduced oxygen levels you will be experiencing.
I developed a very close relationship with the stair climber at my gym, mainly because it also integrated the stairs aspect into it. Two months prior to my trek I was up to an hour session, and then I dropped back down to 30 minutes and added a backpack with 20-pound weights. It was tough, but I also killed it on the hike, so yeah. Worth it.
Obviously, you’re going to have to try to take some long practice hikes if possible. I know weather and schedules sometimes get in the way, but doing this gives you a feel for where you are in your training (and it was a big confidence booster for me).
I did one day hike and one overnight hike prior to my trip, and I would highly recommend that you squeeze those in if possible. This also gives you a chance to test out your gear to make sure everything fits comfortably and is working properly. You don’t need to get all the way up in the Andes and then realize your hydration pack has a leak.
I’m going to give you the basic structure of each day but know that they may be a little different for each tour group and season. Off we go!
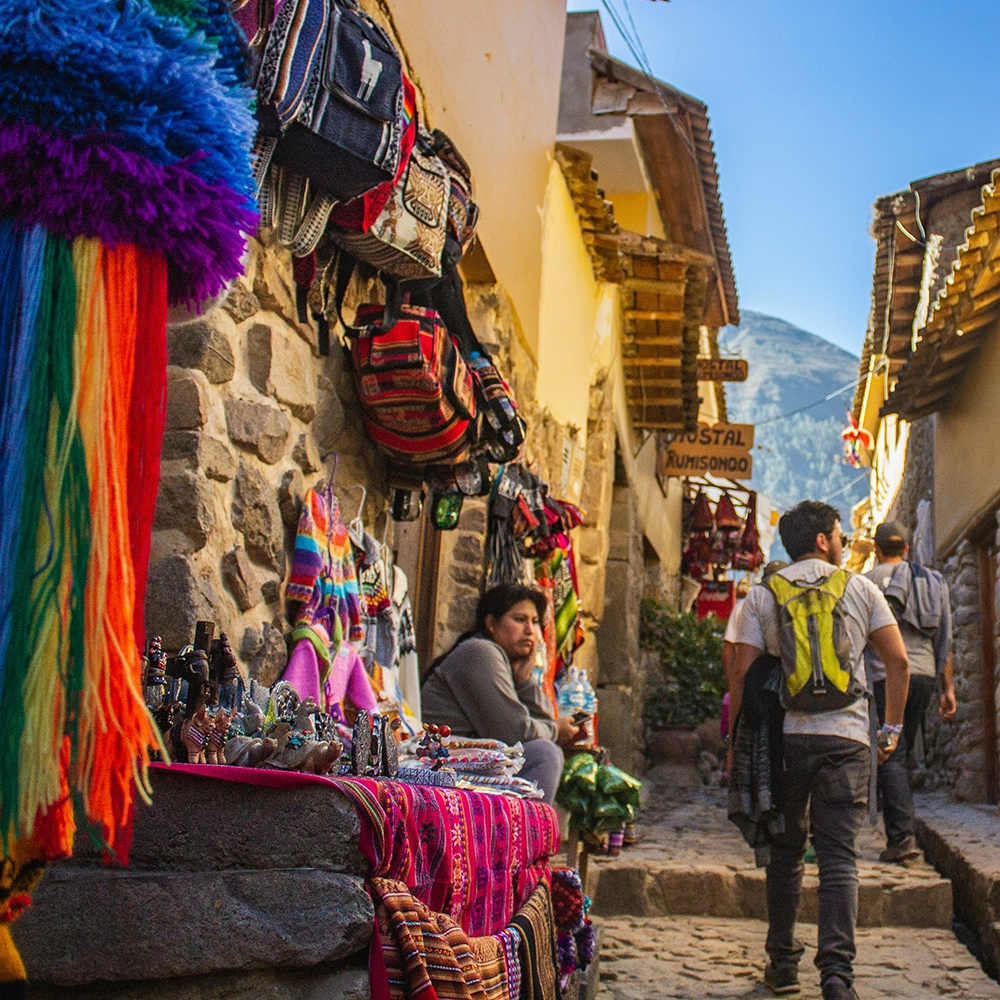
As I stated earlier, you will want to get to Cusco a couple of days before you are scheduled to leave for your trek in order to get acclimated to the altitude. While the city itself is interesting to explore for one day, I would highly suggest you schedule an activity of some sort on day two.
We didn’t have anything pre-planned for our second day, but that was not an issue. There are a lot of travel companies along the main streets in the city that offer rafting trips, four-wheeling excursions (which we did), and tours of the Sacred Valley, amongst others. It was a fun way to have a mini adventure prior to the hike and see a little more of Peru.
This is considered the “easy” day and is by far the shortest of them all. You will leave Cusco with your tour group at about 6 a.m. (get used to waking up early) and arrive at the entrance to the Inca Trail about three hours later.
We started our hike at roughly 9:30 and stopped at our first campsite at 4:30 that afternoon. It gets dark fairly early, so you won’t be hiking much in the evenings.
The hike itself on that first day is pretty flat — a few stretches of uphill climbing but nothing too strenuous. Once you get to your campsite, you will have some time to unwind and clean up before happy hour/dinner. And then right after dinner, you will want to go to bed. Trust me. Everybody does it.
Our guide deemed this day the hardest, and if you hate uphill climbing, you’ll understand why. You will wake up around 5 a.m. and reach Dead Woman’s Pass, the highest point of the entire trek in the afternoon.
To get there, you have to climb a lot of stairs. Like, a lot, a lot. Luckily, our guide broke it up into two sections. We did one stretch of this uphill climbing before lunch and the remainder afterwards.
This helped, but I was definitely glad I had trained as hard as I did. It would have been miserable otherwise.
After you reach Dead Woman’s Pass, you will begin about a one-hour descent to a campsite that you share with most, if not all, of the other trekkers on the trip.
The bathroom situation isn’t the best, so be prepared. Other than that, it’s pretty much like the night before: clean up, eat, sleep.
If you can, though, at least try to stay up to catch the stars one night. I took a midnight bathroom break at this campsite, and the sky was one of the most beautiful things I have ever seen.
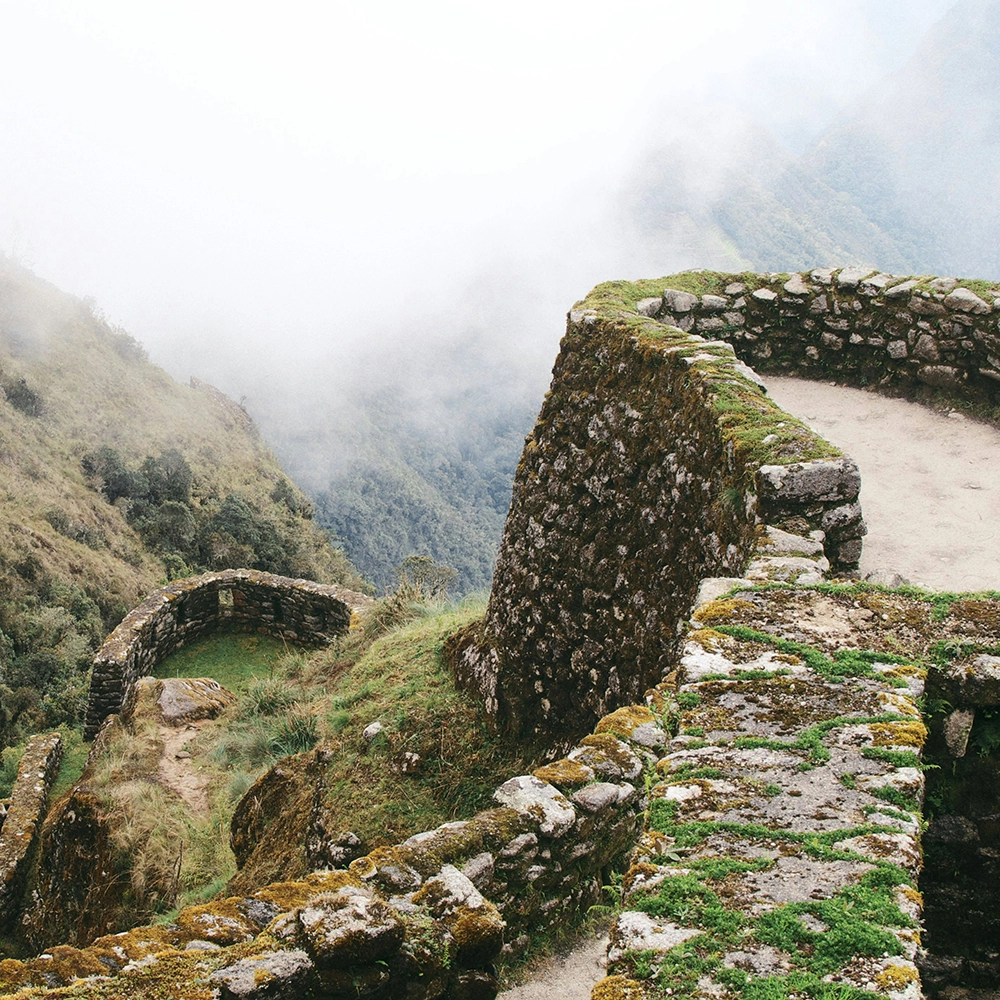
This is the day I deemed the hardest, not because of any tricky or difficult sections but because my joints were aching by the end of it.
It was also one of the best days of the trip, for so many reasons. You explore several different ruins on this day. It really shows how expansive the Inca empire was and how innovative they were as a people.
You also (and this is the part I hated) have a roughly two-hour descent to your next campsite where your knees are constantly pounding stone steps. Mine were screaming by the time we were finished, and I don’t even have joint issues. However, we ended up at some terraces toward the end of the hike, and the view we got — rainbow included — was definitely worth it.
This is your last night together as a group, and I hope you enjoy your companions as much as I did mine. We lingered over dinner a little longer than usual but were still in our tents by 9 p.m. because wake-up call on the last day is early. Really early.
Be ready to wake up at 3 a.m. because that is how early you have to get in line to start the hike to Machu Picchu. They don’t open that entrance until 5:30, so you basically get your gear together, walk 500 meters down to the entrance, and then sit for an hour until you can actually start your hike.
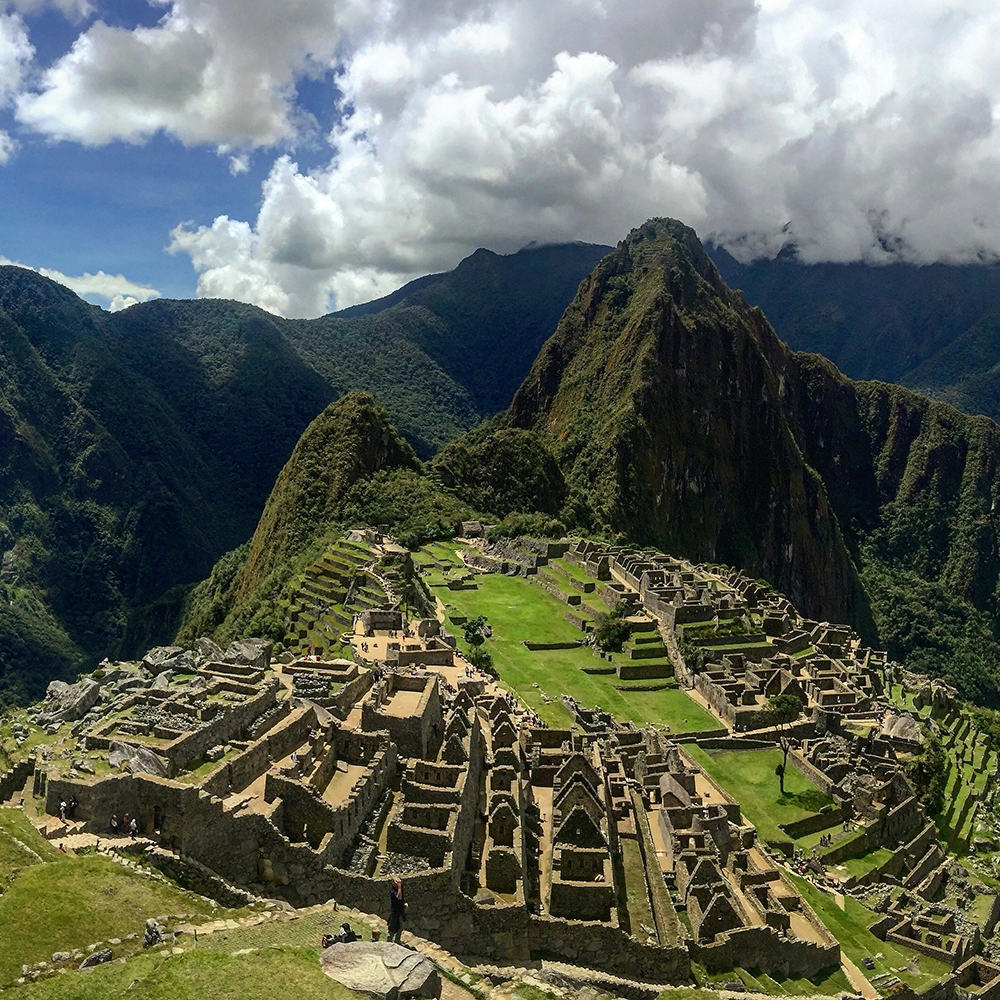
I’m not going to lie. It kind of sucks, but it comes with the territory. Once you get through the entrance, though, be ready to go because you are hightailing it to get to the Sun Gate by sunrise, where you’ll stop for amazing views and pictures, then begin the trek down to Machu Picchu.
It probably takes another hour or so of hiking to descend to Machu Picchu itself. You will then have most of the morning and early afternoon to explore the ruins, which are indescribable. I wish I could explain the awe I felt, but words sometimes don’t do it justice. You’ll understand once you’re there.
You’ll end your trip by taking a bus back down to Aguas Calientes and then a train back to Ollantaytambo where your tour company will have arranged for a bus to transport you back to Cusco.
Ok, this is where I give you the inside scoop many of the other articles I’ve read don’t talk about. First, the bathroom situation.
There’s no better way to say it: they are disgusting. They’re a porcelain hole in the ground that you have to squat over to use. Because the trail is muddy, the bathrooms are also muddy (or at least that’s what everyone is hoping is on the floors).
To “flush,” you pull a string and water will rush out of a pipe at the back of the porcelain hole. When I say rush, I mean rush. You’ll want to strategically pull that string at the same time you're ready to make your exit.
And please, please don’t wear pants that drag on the ground. You won’t want them running through that muck.
Second, don’t plan on taking a shower for the entire length of the trek. They had one at one of the campsites, but considering you’re sharing it with 100 other people, I wouldn’t touch it with a 10-foot pole. The bathrooms are bad enough.
Finally, always layer up. For one, the weather is always highly unpredictable. It could be sunny one minute and raining the next, and you don’t want to be caught without a rain jacket.
Plus, when you are on the more strenuous parts of the hike, your body warms up pretty fast. It’s like you’re working out. Because you are.
Whenever you stop, however, you start to notice the cold, and you’ll want to put on those layers again. I arrived at Dead Woman’s Pass in a T-shirt, and had a fleece, rain jacket, and gloves on by the time we left that area. Layers are your friend.
Some trips require more planning than others. Obviously, a hike on the Inca Trail — or anywhere else — needs more preparation if you’re going to enjoy it and stay safe.
As your itinerary comes together, include travel insurance in your plan. If you’re trekking or participating in other adventure activities, make sure you have coverage for backpacking and other “high risk” activities.
This isn’t standard in all plans, but you can often add optional coverage. The last thing you want is to get sick or hurt on the trail only to find out that your plan doesn’t protect you like you thought.
Talk to a licensed agent to make sure you have the right coverage, or get a quick quote online at SevenCorners.com.
This is a syndicated post authored by travel enthusiast Brittney Knies.
This website and various social media updates provided by Seven Corners contain content, information, articles, videos, and links to websites created by third parties. Seven Corners, its owners, and its employees neither endorse nor are responsible for the accuracy, timeliness, or reliability of any third-party information, statements, opinions, or advice and are not liable for any loss, harm, or damage caused by your reliance upon them. Use of such information or the linked websites is entirely at your risk. Concerns regarding this third-party content should be directed to the third party. Seek professional advice, as appropriate, regarding your use of such information and websites.
Because the information on this website and in Seven Corners’ blogs and other social media is written and compiled using knowledge and information available at a certain point in time, it may become outdated. For that reason, information, events, legal requirements, and product changes (including benefits, limitations, exclusions, and services) may not be up-to-date, complete, or accurate at the point in time it is being read. Again, use of such information is at your risk.